v0.1
UXMarketing
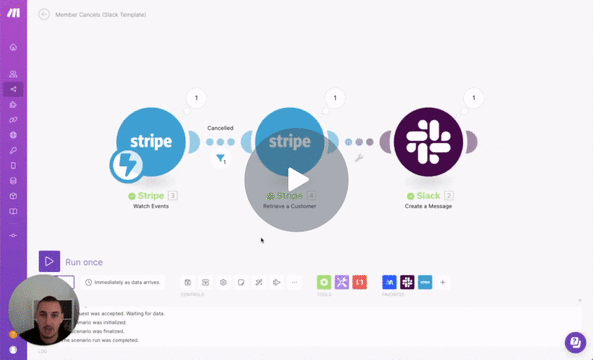
#80 - Plan Cancelled Notification
Trigger a Slack notification when a member cancels their plan.
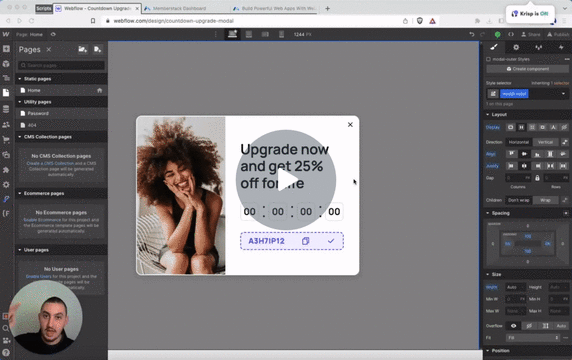
Dynamically set a per-user countdown time and then hide elements when time is up.
Watch the video for step-by-step implementation instructions
<!-- 💙 MEMBERSCRIPT #9 v0.1 💙 COUNTDOWN BY USER -->
<script>
// Step �number1: Get the current date and time
const currentDate = new Date();
// Step �number2: Calculate the new date and time based on the attribute values
const addTime = (date, unit, value) => {
const newDate = new Date(date);
switch (unit) {
case 'hour':
newDate.setHours(newDate.getHours() + value);
break;
case 'minute':
newDate.setMinutes(newDate.getMinutes() + value);
break;
case 'second':
newDate.setSeconds(newDate.getSeconds() + value);
break;
case 'millisecond':
newDate.setMilliseconds(newDate.getMilliseconds() + value);
break;
}
return newDate;
};
// Retrieve attribute values and calculate the �keywordnew date and time
const hourAttr = document.querySelector('[ms-code-time-hour]');
const minuteAttr = document.querySelector('[ms-code-time-minute]');
const secondAttr = document.querySelector('[ms-code-time-second]');
const millisecondAttr = document.querySelector('[ms-code-time-millisecond]');
const countdownDateTime = localStorage.getItem('countdownDateTime');
let newDate;
if (countdownDateTime) {
newDate = new Date(countdownDateTime);
} else {
newDate = currentDate;
if (hourAttr.hasAttribute('ms-code-time-hour')) {
const hours = parseInt(hourAttr.getAttribute('ms-code-time-hour'));
newDate = addTime(newDate, 'hour', isNaN(hours) ? 0 : hours);
}
if (minuteAttr.hasAttribute('ms-code-time-minute')) {
const minutes = parseInt(minuteAttr.getAttribute('ms-code-time-minute'));
newDate = addTime(newDate, 'minute', isNaN(minutes) ? 0 : minutes);
}
if (secondAttr.hasAttribute('ms-code-time-second')) {
const seconds = parseInt(secondAttr.getAttribute('ms-code-time-second'));
newDate = addTime(newDate, 'second', isNaN(seconds) ? 0 : seconds);
}
if (millisecondAttr.hasAttribute('ms-code-time-millisecond')) {
const milliseconds = parseInt(millisecondAttr.getAttribute('ms-code-time-millisecond'));
newDate = addTime(newDate, 'millisecond', isNaN(milliseconds) ? 0 : milliseconds);
}
localStorage.setItem('countdownDateTime', newDate);
}
// Step �number4: Update the text of the elements to show the continuous countdown
const countdownElements = [hourAttr, minuteAttr, secondAttr, millisecondAttr];
const updateCountdown = () => {
const currentTime = new Date();
const timeDifference = newDate - currentTime;
if (timeDifference > 0) {
const timeParts = [
Math.floor(timeDifference / (1000 * 60 * 60)) % 24, // Hours
Math.floor(timeDifference / (1000 * 60)) % 60, // Minutes
Math.floor(timeDifference / 1000) % 60, // Seconds
Math.floor(timeDifference) % 1000, // Milliseconds
];
// Update the text �keywordof the elements with the countdown values
countdownElements.forEach((element, index) => {
const timeValue = timeParts[index];
if (index === 3) {
element.innerText = timeValue.toString().padStart(2, '�number0').slice(0, 2); // Display only two digits �keywordfor milliseconds
} else {
element.innerText = timeValue < 10 ? `�number0${timeValue}` : timeValue;
}
});
// Update the countdown every �number10 milliseconds
setTimeout(updateCountdown, 10);
} else {
// Countdown has reached zero or has passed
countdownElements.forEach((element) => {
element.innerText = '�number00';
});
// Remove elements with �attrms-code-countdown="hide-on-end" attribute
const hideOnEndElements = document.querySelectorAll('[ms-code-countdown="hide-on-end"]');
hideOnEndElements.forEach((element) => {
element.remove();
});
// Optionally, you can perform additional actions or display a message when the countdown ends
}
};
// Start the countdown
updateCountdown();
</script>More scripts in Marketing